diy succulent mobile

4.03.2014

Note: This post was previously published as a part of my freelance work here
Obsession confession: house plants. You can never have enough. They are the silent companions, the life teachers, and the friends who will always put a smile on your face.

Double obsession confession: succulents. They will never get mad at you for forgetting to water them, and they look like Mother Nature’s coolest alien.

Now here’s a fun new DIY to celebrate the obsession and fill your house with hanging succulents.

You’ll Need:
-          Sculpt It (air hardening sculpting material)
-          5 Old Jars (I used a mixture of jars from spices and preserves that varied in size)
-          5 Inches of stiff wire
-          String
-          Pointed clay tool or safety pin to poke holes
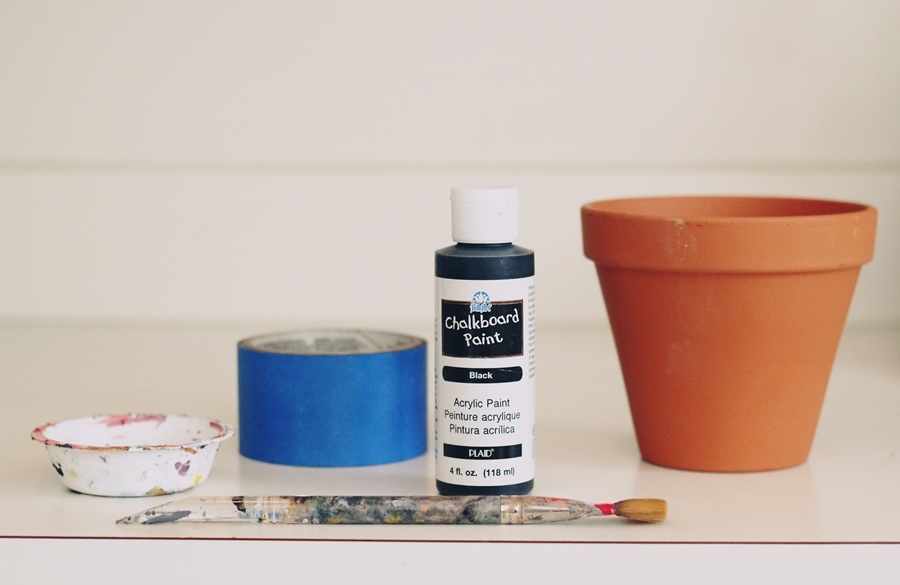
-          Paint color of your choice
-          Paint Brush
-          Cup & Water for painting
-          Painter’s tape
-          5 Small succulents & soil

Directions:
1.       Taking a small piece of sculpt it and roll it into a ball.

2.       Being flattening the ball into a round sheet with your fingers

3.       Mold the flattened piece around the bottom of a jar.

4.       Polk two holes on opposites sides of the clay where you will feed your strings through.

5.       Poke another hole in the center bottom for string as well.

6.       Let your sculpt it dry completely. Part way through, pull it off the jars and let it sit to continue drying. The whole drying process takes about one day or two. Be patient.
7.       Once your clay is dry, tape off the top half with painters tape.

8.       Thoroughly paint the bottom half and let dry.

9.       String two strings through the holes on either side of each planter, and knot them the inside to secure. Leave the strings on the smallest and second to biggest planters fairly long so that you can choose how low they will hang.

10.       To begin putting everything together, figure out which succulent you want to put in which container, and line them up smallest to biggest.

11.       Plant the biggest container first. Then, pick up the strings so you can find where it hangs centered. Once you’ve found the spot, tie a knot and feed the strandsthrough the bottom hole of the next planter, tying another knot to secure.

12.       Plant your second to largest pot next and set the two to the side.
13.       Plant the next three planters on their own using the same method. So you will have one strand of two planters, and another of three.

14.       Hang both strands from the ceiling so that the hole of one hangs next to the knot above the other. Stick a piece of wire in the hole and wrap it around the knot of the other to keep them separated like a mobile.

15.       And you’re done!

pasta extravaganza

11.28.2013

Adam and I have been experimenting with homemade ravioli. We're in the process of nailing down the optimal squash for flavor, and the perfect techniques. Each batch also includes our own ricotta salata crafted from scratch. I make the filling, he preps the dough, and together we make a great team. I promise to share on a recipe as soon as we have everything perfected. In the mean time, I wanted to share some of the lovely snaps I've captured along the way. 

Oh, and HAPPY THANKSGIVING!!!

terrarium workshop with terrain

11.26.2013

We have these awesome things at work called "Brown Bag Lunches." There is a different topic every week, and the idea is that, over lunch, you learn something new. When we got the newsletter that last week's would be terrarium workshop I b-lined for the signup. 

So, on Friday, Chelsi, Melissa, and I headed to the workshop with Terrain. They supplied us with drainage (gravel), air & water purification (charcoal), nutrient rich soil, plants, and fun decorating supplies. We each bought a vessel and got to work. 

My terrarium ended up as a succulent arrangement with purple flowers (not sure of the name), rocks, and moss. What I love about terrariums is that you can really just throw everything in, and there is little chance that it will look bad. There are only a few essential things you need to make the project a success.

--

How to make a successful terrarium:
1. Your vessel should always start with drainage (gravel, pieces of glass), purification (activated charcoal), and good potting soil. You only need a thin layer of charcoal, do not over-do it!
2. Do not combine succulents & ferns. Succulents like drier climates while ferns enjoy a moister atmosphere. They will not be happy living in the same environment.
3. Do not over water! Your plants only need a misting about twice a week. 
4. Stick to the rule of odd numbers, build a terrarium with 1, 3, 5...plants according to your vessel size. 
5. Do not place your terrarium in a place with direct light. They prefer a location with indirect sunshine.

--

Good luck with your terrarium building! I can't wait to put more together myself. 

every plant has a name

6.30.2013


My green thumb and thirst for the homegrown has really taken off this summer. For years I've been pining to fill a house with plants, and now moving into a place with enough natural light, it's finally becoming a reality. In addition to our succulent and house plant friends, I've been potting these little terracotta pots with herbs all around the house. I decided I'd need a way to remember what I started where, so it led to a simple but cute chalk paint DIY. Since I'm a new gardener, I love that it's a low commitment form of labeling. If something dies, or if I decide to seed a different plant next year, I can always erase the chalk and write something new. It's extremely easy to do, and in no way a novel idea, but I thought the end effect was very homey, practical, and cute. Follow along to see how you can do the chalk paint labeling yourself. 

What You'll Need:
- chalkboard paint
- terracotta planter
- blue painter's tape
- paint brush
- paint dish

Directions:
1. Rip your tape in half length-wise.

2. Section off a parallelogram shape (wider at the top, narrower at the bottom) on your planter.

3. Paint two, even coats of paint within the taped off section, waiting about 10 minutes in between coats.

4. Let the paint dry for about an hour, and then remove tape, plant, & label.

And you're done!!

building plant beds

4.18.2013

Here it is, the next step in our backyard garden adventure. After getting our plants started it was time to make a home for them to live in, two very big 3' x 6' homes. It involved down and dirty measuring, cutting, and drilling - and boy was it fun. 

To source the wood for our project, we stopped by one of the coolest spots I've discovered in Philadelphia to date. The place is called Atlas Wood Products, and it's located in a northern - I must say it, ghetto - part of of the city. We rolled up to this giant warehouse in the middle of abandoned ruins on one of the prettiest spring days. I had no idea what to expect, but we met up with the guy who ran the place and began to follow him inside. You first walk through a labyrinth of junk, this guy's a character, and then you make your way into a big open room filled with stunning wood creations that he's made for clients. I was immediately inspired, and then he took us further in to where we found what must have been the size of four football fields filled with wood.  Everywhere you looked there was wood of all kinds - palettes, barn wood, treated, scrap...you name it. We looked around and got all the wood we needed, including palettes to set our planters up on for water drainage.

After picking up all the materials we needed, we brought everything home, and over the next week began to piece our planters together. It felt so good to get tough - lifting heavy things, drilling in screws, and huffing and puffing around. Next time around, I think we'll be a bit more accurate and will design the planters differently, but the whole project was very fun. After all, we're no experts, we're only starting out and learning along the way. This is all just the beginning.


Measuring & sawing...


Drilling...

And there you have it. Two big planters to make a home for (most of) our plants in the backyard this season. I know these pictures make it look like Adam did all the work, but I swear I helped too.

 Next step, transplanting & soil. I also have a fun palette garden how-to that you won't want to miss. 
Stay tuned!

making babies

3.25.2013

So here is the big news...I'm moving in with Adam...and...we're going to have...

A garden! Full of little babies! Babies as in plants that is. Tomatoes, peppers, kale, herbs - it will be full of all our favorite things. We got started on the little guys that need a time inside using recycled bottles. All you have to do is cut the bottle in half with a utility knife, drill small holes in the cap, and then you have a self-watering container to germinate seeds in. A week later to the tee, we have little guys sprouting up. Now that they're showing some green, we turned on a fan to circulate air and flood lights equipped with agro bulbs to give them light. Stay tuned for all the updates as we build planters, compost, fertilize, harvest, and of course, COOK, this season. This is going to be fun, here's to new life!

dream catcher and pom pom gift wrap ideas

12.20.2012

At work I was recently given the fun project of planning/making our holiday gifts for everyone that we've worked with over the past year. I wanted to do something that felt a bit more winter than straight up holiday, so I stuck to a neutral color palette with pops of gold and red. To make them a bit more unique I had the idea to play around and do fun things with the yarn. The first result is dream catcher inspired, and the second features a fun wintery pom pom!

What You'll Need:
Feathers
Cream Colored Yarn
Masking Tape
Scissors

Gold Leafing Directions:
1. Dip the tips of your feathers in the gold leaf adhesive and let dry for a couple minutes.
2. Fold a small piece of gold foil around the tip of the feather until it is nicely wrapped.
3. After a few minutes hold the feather tight to the ground and press the leaf into the feather using a paint brush.
4. After 20 minutes of so, you can use the sealer if you want to. It's mostly to prevent tarnishing for things that are meant to last a while, so I did not use it.

Wrapping The Box:

It may seem crazy to give directions here, but wrapping is actually an art that takes some practice. Here are some good things to know & steps to take.

1. When you first wrap the paper around your box, you want to get it as tight as possible.
2. Next, fold the paper into a triangle, making a crease along the outer edge of the box. 
3. Fold along your previous crease to make the triangle lay flat against the box. Make another crease right at the bottom, holding that triangle tight to your gift.
4. After making the creases on both sides, fold over the edge of your flap. 
5. Cut a piece of tape with scissors so that it is straight, fold the flap up, and stick. 

*Tip: when cutting your wrapping paper to size, you want to have about 1.5" of excess on the sides. It is important to make sure that you don't have too much because that is where you'll run into sloppy-looking presents. 

Dream Catcher Yarn:
1. Taking 5 yards of yarn, tie the string around your gift like you would normally in a criss-cross "t" shape. You want where the yarn intersects to be further to one side, and not in the middle.
2. After tying a knot, take the yarn and tie it at 1"-3" intervals around the entire string. Stop a couple of inches right before you get to the final knot.
3. Taking the tale of the yarn that is left, you want to string it through the loops that you've made making a zig zag shape. You really can't mess up here, just loop and pull making a spiderweb effect. At certain points you may want to knot it around the loop to hold it in a certain place.

Making Pom Poms:
1. Cut two same size circles out of cardboard. Make a slit going into the center and cut out the center as well. 
2. Tie your yarn around the end, and proceed to wrap generously around the cardboard. 
3. Once you reach the end, tie off your string. 
4. Taking your scissors, cut down the center, in between the two pieces of cardboard. After you've cut 2/3 of the way around take another string and start to weasel it between the cardboard pieces to tie off around the center of your strings. 
5. Once you've cut all the way around, tie the string around the center, leaving the tails long so that you can attach it to your gift. Fluff the yarn to get your pom pom.

Fan Yarn & Attaching the Pom Pom:
1. Taking 4.5 yards of string, tie around the package once and knot, leaving one end extremely long and the other short.
2. Taking the long end, wrap the yarn around the gift to the front and tie a knot in the center.
3. Return the yarn to the back, and tie a knot around your first. Continue wrapping & tying knots at the center until you've done so four times. End at the back, tie a double knot, and trim excess.
4. Taking the two long strings of your pom pom, tie the pom pom around the center knot on the front of your package.
5. I suggest double knotting, and then trim your strings so that they are the same length as the rest of your pom pom strings.

Happy holidays everyone!